How to Crochet an Amigurumi Bunny

Ahtasham Rajput
0


How to Make

Abbreviations

Chain – ch

Slip stitch – sl st

Stitch/es – st

Double crochet – dc

Double crochet increase – inc

Double crochet decrease – dc2tog


Pattern Notes

Work in a continuous round without closing off each round with a sl st.

Place a stitch marker at the end of each round and move it up as you work.

Use a tapestry needle to weave in the yarn ends.

Use a 6mm crochet hook and Soft and Chunky yarn in Cream throughout the pattern.

Head Step-1

Round 1: start 6 dc in a magic ring [6] Round 2: inc 6 times [12] Round 3: (inc, dc in next st) repeat 6 times [18]

Step-2
Round 4: (inc, dc in next 2 st) repeat 6 times [24] Round 5: (inc, dc in next 3 st) repeat 6 times [30] Round 6: (inc, dc in next 4 st) repeat 6 times [36]
Step-3
Round 7: (inc, dc in next 5 st) repeat 6 times [42] Round 8: (inc, dc in next 6 st) repeat 6 times [48] Round 9: (inc, dc in next 7 st) repeat 6 times [54]
Step-4
Round 10: (inc, dc in next 8 st) repeat 6 times [60] Round 11 – 18 (8 rounds in total): dc in each st around [60] Round 19: (dc2tog, dc in next 8 st) repeat 6 times [54]
Step-5
Round 20: (dc2tog, dc in next 7 st) repeat 6 times [48] Round 21: (dc2tog, dc in next 6 st) repeat 6 times [42] Insert the safety eyes between rounds 16 and 17 approx. 16 st apart. Start stuffing the head and continue as you go.
Step-6
Round 22: (dc2tog, dc in next 5 st) repeat 6 times [36] Round 23: (dc2tog, dc in next 4 st) repeat 6 times [30] Round 24: (dc2tog, dc in next 3 st) repeat 6 times [24]
Step-7
Fasten off and weave in the yarn end. Use pink embroidery thread to embroider the nose between rounds 15 and 17 making long stitches to create a pink triangle. Use black embroidery thread to embroider the mouth under the nose between rounds 18 and 20 making long stitches using the photos as guide.
Ear (Make 2) Step-1

Round 1: start 6 dc in a magic ring [6] Round 2: (inc, dc in next 2 st) repeat twice [8] Round 3: (inc, dc in next 3 st) repeat twice [10]
Step-2
Round 4: (inc, dc in next 4 st) repeat twice [12] Round 5: (inc, dc in next 5 st) repeat twice [14] Round 6: (inc, dc in next 6 st) repeat twice [16]
Step-3
Round 7 – 21 (15 rounds in total): dc in each st around [16] Round 22: dc2tog, dc in next 14 st [15] Round 23: dc in each st around [15]
Step-4
Round 24: dc2tog, dc in next 13 st [14] Round 25: dc in each st around [14] Round 26: dc2tog, dc in next 12 st [13]
Step-5
Round 27: dc in each st around [13] Round 28: dc2tog, dc in next 11 st [12] Round 29: dc in each st around [12] Round 30: dc2tog, dc in next 10 st [11]
Step-6
Round 31: dc in each st around [11] Round 32: dc2tog, dc in next 9 st [10] Round 23: dc in each st around [10]
Step-7
Do not stuff. Fasten off leaving a long tail for sewing the ears between rounds 6 and 8 of the head.
Step-8
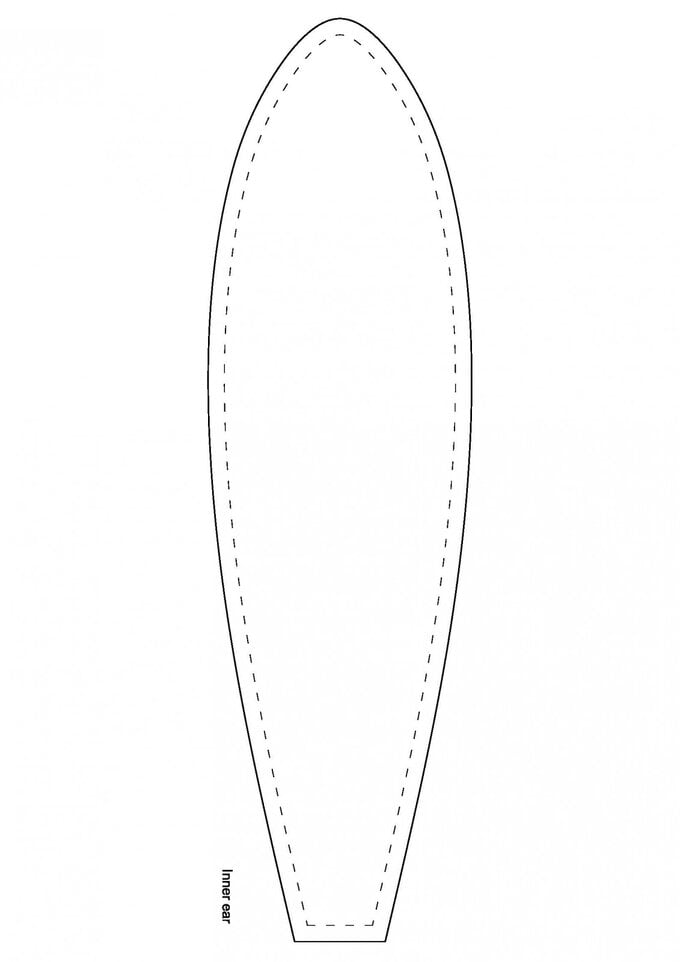
For the inner ears: cut two pieces from the flannel fabric using the template as guide. Cut along the continuous line and fold the fabric along the dotted line. Use sewing pins to secure the fabric onto the ears and sew the inner ear in place using the sewing thread.
bunny-inner-ear-template.jpg?sw=680&q=85
Body Step-1

Round 1: start 6 dc in a magic ring [6] Round 2: inc 6 times [12] Round 3: (inc, dc in next st) repeat 6 times [18]

Step-2
Round 4: (inc, dc in next 2 st) repeat 6 times [24] Round 5: (inc, dc in next 3 st) repeat 6 times [30] Round 6: (inc, dc in next 4 st) repeat 6 times [36]
Step-3
Round 7: (inc, dc in next 5 st) repeat 6 times [42] Round 8: (inc, dc in next 6 st) repeat 6 times [48] Round 9 – 13 (5 rounds in total): dc in each st around [48]
Step-4

Round 14: (dc2tog, dc in next 6 st) repeat 6 times [42]

Round 15 – 17 (3 rounds in total): dc in each st around [42] Round 18: (dc2tog, dc in next 5 st) repeat 6 times [36]

Step-5
Round 19 – 21 (3 rounds in total): dc in each st around [36] Round 22: (dc2tog, dc in next 4 st) repeat 6 times [30] Round 23 – 25 (3 rounds in total): dc in each st around [30]
Step-6
Round 26: (dc2tog, dc in next 3 st) repeat 6 times [24] Stuff the body using toy stuffing. Fasten off leaving a long tail for sewing the body to the head.
Arm (make 2) Step-1

Round 1: start 6 dc in a magic ring [6] Round 2: inc 6 times [12] Round 3 – 9 (7 rounds in total): dc in each st around [12]

Step-2
Round 10: dc2tog, dc in next 10 st [11] Round 11 – 12: dc in each st around [11] Round 13: dc2tog, dc in next 9 st [10]
Step-3
Round 14 – 19 (6 rounds in total): dc in each st around [10] Stuff slightly using toy stuffing. Fasten off leaving a long tail for sewing the arms to the body.
Legs (make 2) Step-1

Round 1: start 6 dc in a magic ring [6] Round 2: inc 6 times [12] Round 3: (inc, dc in next st) repeat 6 times [18]

Step-2
Round 4: (inc, dc in next 2 st) repeat 6 times [24] Round 5 – 9 (5 rounds in total): dc in each st around [24] Round 10: (dc2tog, dc in next 6 st) repeat 3 times [21] Round 11: dc in each st around [21]
Step-3
Round 12: (dc2tog, dc in next 5 st) repeat 3 times [18] Round 13 – 15 (3 rounds in total): dc in each st around [18] Round 16: (dc2tog, dc in next 4 st) repeat 3 times [15] Round 17 – 19 (3 rounds in total): dc in each st around [15]
Step-4
Round 20: (dc2tog, dc in next 3 st) repeat 3 times [12] Round 21 – 23 (3 rounds in total): dc in each st around [12] Round 24: (dc2tog, dc in next 2 st) repeat 3 times [9]
Step-5
Round 25 – 27 (3 rounds in total): dc in each st around [9] Stuff slightly using toy stuffing. Fasten off leaving a long tail for sewing the legs to the body.
Tail: Step-1

Make a 9cm diameter pompom using the pompom maker. Cut a long tail of yarn to thread the pompom around the center, and use the same tail to sew the pompom to the back of the body.

Bow Tie: Step-1

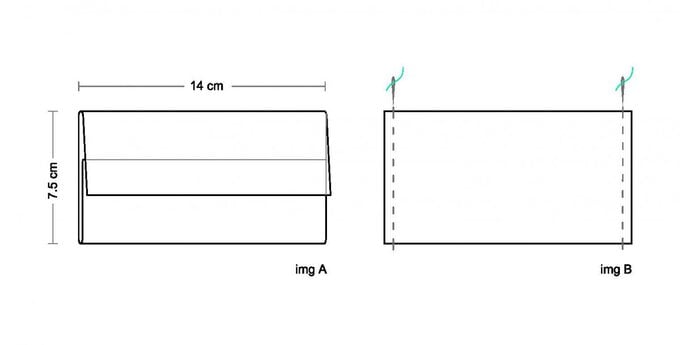
Cut a rectangle 17 x 14 cm from the flannel fabric With the wrong side of fabric facing down, fold and overlap the longest sides (the sides that measure 17 cm) by 2 cm (img A). Sew along the open sides using running stitch (img B).
bunny-bow-tie-1.jpg?sw=680&q=85
Step-2
Turn inside out and insert some toy stuffing. Cut a rectangle 10 x 5 cm from the flannel fabric to tie the bow in the middle. With the right side of the fabric facing down, fold the longest sides (the sides that measure 10 cm) for 1 cm per each side. Wrap the piece of fabric around the main part of the bow until you get a nice shaped bow, secure the piece with few stitches.
Step-3
Stitch the bow on to the body of the bunny or use a safety pin.

Post a Comment

0Comments

Post a Comment (0)